How To Build A Shed In 10 Easy Steps
Are you one of those persons who likes to organize their things neatly and in a particular order? Or needs to keep them away from a child's curious hands?
Either way
Either way, the solution to your worry is a portable storage shed. A wooden storage shed can be just an extra storage space or a nice little workshop where you can keep your equipment or gardening tools and putter around in.
Here are some general points to remember on building your own shed.
There are two ways to build a shed. Either build it yourself or you can hire a local handyman to do it for you.
Hire someone
Hire a local handyman. One good way of knowing who to trust is to ask around your neighborhood for reliable handyman services. If you can’t find one, go online and search through the classified ads sites under home and garden services offered within your local area.
If you don’t have the luxury of time, it’s better to hire a local handyman to do it for you. Either way, building your own shed is the best way to get quality wooden storage shed.
Do it yourself
Do it yourself. If you decide to do it yourself, you can assemble one by using a shed kit or you can buy lumber and build your own. Shed kits come in a variety of sizes and styles. In addition, the materials range from metal, vinyl or wood. The tools necessary to assemble them are common ones found in your toolbox.
On the contrary building your own shed with lumber is a better choice. Shed plans can be downloaded online free of charge or you can pay for the better ones at very affordable prices. Just remember that paid Internet shed plans should include a material list to give you a rough estimate on how much you are going to spend.
FREE Videos
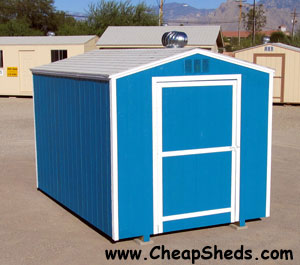
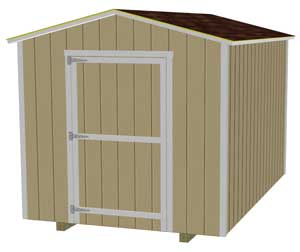 This 8x12 has 3 1/2 inches of overhang on all 4 sides.
The 10 Steps
Construction is broken down into the following 10 steps...- Foundation
- Floor
- Trusses
- Walls
- Door
- Raise walls
- Open door
- Roof structure
- Trim
- Shingle roof
Features Of This Shed Design
- Roof line: Gable
- Roof pitch: 3/12
- Overhang: 3 1/2 inch or 5 1/2 inch option
- Roof covering: Asphalt shingles
- Roof structure: 2x4 trusses 24 inch O.C.
- Foundation: Pressure treated 4x4 skids
- Floor joists: (8 wide) 2x4 at 16 inch O.C. (10/12 wide) 2x6 at 16 inch O.C.
- Floor covering: 3/4 inch CDX plywood
- Wall materials: 4x8 sheets of hardboard siding or T-111
- Wall stud spacing: 2x4 at 24 inch O.C.
- Wall framing: top and bottom plates with double corner studs
- Door style: Out swinging shed door
- Door location: Can be located any where on any wall
- Overall height at peak, not including foundation: 8 ft
- Outside wall height at eaves, not including foundation: 7 ft
- Door opening: 43 inches by 71 inches
- Minimum inside height: 77 inches
- Maximum inside height: 92 inches
- Inside height under collar beam: 84 inches
There are four places where building an 8 wide and a 10-12 wide shed differ.
These details are explained in full in the appropriate step. I just want to point them out so you will be aware that most of the procedure is the same.- 8 wide sheds use 2x4 floor joists, 10-12 wide sheds use 2x6 floor joists
- You should should add some 2x4 blocking where the large and small pieces of plywood join on 10-12 wide sheds for extra floor strength
- You will need to splice a 3 to 6 inch piece of scrap siding at the top of the gable end truss on 10-12 wide sheds
- On a 10 wide shed door you will need to change the spacing and add one additional upright to the inner door frame
Buy 2x4 Precut studs if you can find them
The first is to use 2x4 precut studs if you can find them. Precuts are 2x4's that are 92 5/8 inches long as opposed to the normal 8 ft.Use them for wall studs and trusses and you'll save 25 to 50 cents per board. If your building supply store doesn't carry them then just use full 2x4x8ft lumber.Use screws instead of nails
The second thing I suggest is to use screws instead of nails. Screws have better pulling power and can pull a twisted board into place better than a nail can. Screws also have better holding power. This means they will hold your 2x4 frame in place tighter and longer time than nails can.Drill 1/8 inch pilot holes
Whether you're using screws or nails I recommend drilling 1/8 inch pilot holes when assembling the frame because this will prevent splitting the ends of your boards. Also your nails or screws will not go astray because of the grain of the wood, nor will you have a problem with knots. This might add a little additional time to your shed building project but it will make construction much easier for the novice builder. But if you have a nail gun then by all means use it. Just be careful to not split the ends of your wood.Use pre primed composite hardboard siding
Using pre primed 4x8 sheets of composite hardboard siding will allow you to build your shed in the least amount of time and for the least amount of money. And composite siding holds paint much better than natural wood. This will save you the step of applying a base coat of primer and your paint job will last longer. Which means you won't have to repaint your shed as often.Make your own trim
Make your own trim from sheets of composite hardboard siding. You can buy 4x8 sheets of the same siding but with no grooves, and rip them into 2 1/2 inch strips with a table saw. If your building supply store doesn't sell no groove siding then just use regular grooved siding. But then you will have to spend a little additional time cutting around the grooves if you want your trim to look its best. Two sheets of no groove siding will give you more than enough trim to build up to a 12x20 shed. You don't absolutely need a table saw. You can cut the trim strips with a circular saw but your cuts will not be nearly as clean as with a table saw. In fact I suggest that you borrow or rent a table saw if you don't have one because it will give you a much cleaner finished shed.Tools
Here's a list of tools you'll need to build your shed. If you don't have some of them likely you know someone who does who will let you borrow them for a week end or two.Hand tools
- Claw hammer
- Tape measure and pencil
- Speed square
- Level
- Chaulk line
- Tin snips
- Step ladder
- Utility knife
- Hand saw
Power tools
- Extension chords
- Circular Saw
- Electric drill, 1/8 inch drill bits and philips screw driver bits
- Router with a 1/4 inch bit and a follow collar
- Table saw
Paint Equipment
- Caulk gun
- Brush
- Roller and cage (or spray gun)
Disclaimers
Now before we get started with the actual building I have a couple of disclaimers...Building Permits
You might need building permits to build a shed in your area so check with your local building department before you get started.Building codes
The construction techniques in these plans might not meet building codes in your area as they vary around the country. So your building department might ask you to make a few changes to these plans. But the building departments are usually very helpful and will let you know exactly what their requirements are.No guarantees
Even though I have build thousands of sheds like this with no problems, I make no guarantees about the structural integrity of this shed.Step 1: Foundation
The main function of your sheds foundation is to transfer the weight of your shed and its contents to the ground. But it also serves several other important functions.- It provides a way to level your shed if necessary
- It protects your sheds floor against moisture
- And it protects your shed against termites
- When necessary can protect your shed from movement resulting from frost heave, water or wind.
4 General Types Of Shed Foundations
- Simple skid foundation on earth, gravel or concrete blocks
- Wood and concrete pier foundation
- Concrete slab which serves as both a foundation and floor
- Floor-less foundation when you want to build a shed without a floor
Simple Skid Foundation
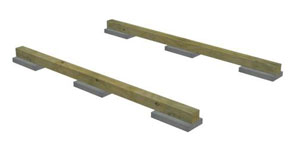 A simple skid foundation consists of two pressure treated runners laid parallel on the ground.
This is a lot cheaper than a concrete slab and has the added benefit of keeping your shed portable should you ever want to move it in the future.
A simple skid foundation consists of two pressure treated runners laid parallel on the ground.
This is a lot cheaper than a concrete slab and has the added benefit of keeping your shed portable should you ever want to move it in the future. Pressure treated means that the skids are rated for long term ground contact and are resistant to water rot and termite damage.
Pressure treated wood is usually some shade of green as a result of it's chemical treatment and is labeled with a tag to identify it as being pressure treated.
Pressure treated means that the skids are rated for long term ground contact and are resistant to water rot and termite damage.
Pressure treated wood is usually some shade of green as a result of it's chemical treatment and is labeled with a tag to identify it as being pressure treated.See Table 2 and Figure 2
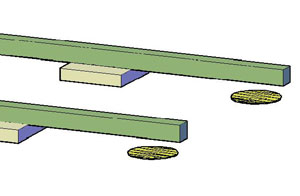
Cut your skids to length using measurement “B” From Table 2 in your shed plans. Don't trust the factory cuts because large pieces of dimensional lumber are usually ¼ to ½ inches longer than stated. Select a location with adequate drainage then clear and level the building area. You can lay the skids directly on the ground, on concrete blocks, or on a bed of gravel. Their spacing will differ depending on the width of the shed you're building. The measurement for the skid spacing is measurement “D” in Table 2, and is shown on Figure 2: Floor Dimensions and Layout. If your site is fairly level you can lay the skids directly on the ground. If your site is not level then place concrete blocks under each skid every 4 feet or less and build the low points up with more blocks and wedges until the skids are approximately level.
  Dig the ground out to provide a stable base for the blocks or skids where necessary.
Don’t worry about getting the skids perfectly level at this point because you'll make the final level when the floor frame is complete.
Dig the ground out to provide a stable base for the blocks or skids where necessary.
Don’t worry about getting the skids perfectly level at this point because you'll make the final level when the floor frame is complete. If drainage is a problem you can dig a trench under each skid about 12 inches wide and 12 inches longer than the length of your shed, fill it with gravel and place your skids on top.
Shed Tie Downs
If you expect to have a problem with your shed moving from frost heave, water or wind, or if it's required by building codes in your area you can tie your shed down. I've already covered shed tie downs in these other posts...- Why you might need to tie your shed down
- Cheap home made shed tiedowns
- Frost heave and your shed foundation
Wood And Concrete Pier Foundation
The location, number, size and depth of the piers might be dictated by building codes. It will also be a function of the weather in your area. You might need to dig down below the frost line to get the best results. In the absence of building codes and with moderate weather you should have a pier at each corner, about 12 inches in diameter and going down 24 to 36 inches into the ground. In addition you will need a concrete block support every 4 feet or less in between the piers.Dig Holes
 Lay your skids out, level and square them as above. But don't put a support block at the end of the skids where you will place the piers. Mark the ground where you will dig your holes about 6 to 8 inches from the end of the skids.
Move the skids out of the way, dig your holes and put the skids back in place. Measure from the bottom of the skid to the bottom of each hole and cut a pressure treated 4x4 pier 4 inches less than this measurement. This will allow enough room for concrete to flow under the bottom end of the pier to prevent wood to earth contact. Just an extra precaution.
Lay your skids out, level and square them as above. But don't put a support block at the end of the skids where you will place the piers. Mark the ground where you will dig your holes about 6 to 8 inches from the end of the skids.
Move the skids out of the way, dig your holes and put the skids back in place. Measure from the bottom of the skid to the bottom of each hole and cut a pressure treated 4x4 pier 4 inches less than this measurement. This will allow enough room for concrete to flow under the bottom end of the pier to prevent wood to earth contact. Just an extra precaution.
Install Piers
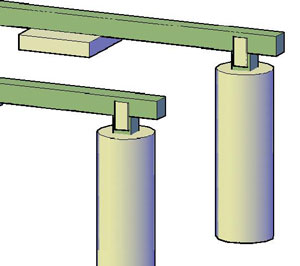 Place the 4x4 piers into their holes and secure them to the skids. You can use a metal mending plate on each side, or a metal strap going over the top of the skid attached to either side of the 4x4 pier. Or you can use a specializes metal Simpson tie if they are avaliable in your local store.
With the 4x4 piers hanging down in the empty holes, re square and re level the skids. When they are correctly positioned then fill the holes with concrete up to ground level and let them dry for a day or two.
Place the 4x4 piers into their holes and secure them to the skids. You can use a metal mending plate on each side, or a metal strap going over the top of the skid attached to either side of the 4x4 pier. Or you can use a specializes metal Simpson tie if they are avaliable in your local store.
With the 4x4 piers hanging down in the empty holes, re square and re level the skids. When they are correctly positioned then fill the holes with concrete up to ground level and let them dry for a day or two.Finished Foundation
 Now you have a solid foundation to build your floor on.
Before you sheet your floor you can add some metal straps or H25's to tie the skids to the floor joists for extra security.
Now you have a solid foundation to build your floor on.
Before you sheet your floor you can add some metal straps or H25's to tie the skids to the floor joists for extra security.Foundation for floor less shed
You don't necessary need a floor in your shed as long as you have a suitable foundation. Here are 2 foundation options if you want to build without a floor.- Pressure treated wood with post and concrete piers
- Concrete stem wall
Pressure treated wood with post and concrete piers
Layout perimeter
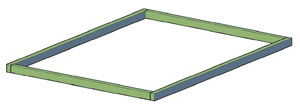 Lay out pressure treated 4x6's to make a wooden perimeter frame the same size as the shed. Turn them so they are 6" tall. Pull a tape measure diagonally across to make sure the frame is square.
This is an example of a foundation frame for a 12x16 shed.
Lay out pressure treated 4x6's to make a wooden perimeter frame the same size as the shed. Turn them so they are 6" tall. Pull a tape measure diagonally across to make sure the frame is square.
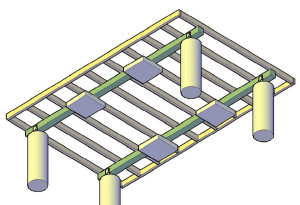
This is an example of a foundation frame for a 12x16 shed.Install post and piers
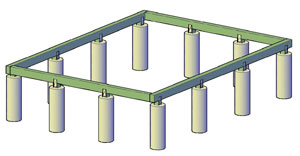 Mark where you want your post and piers to be. Remove the pressure treated wood perimeter frame and install the piers every 4 to 6 ft, as described previously.
And make sure it's level and square then secure the wood perimeter frame to the uprights with galvanized metal straps.
Don't worry about tying the individual perimeter pieces together because once you tie the shed in, that will tie all the foundation pieces together.
Mark where you want your post and piers to be. Remove the pressure treated wood perimeter frame and install the piers every 4 to 6 ft, as described previously.
And make sure it's level and square then secure the wood perimeter frame to the uprights with galvanized metal straps.
Don't worry about tying the individual perimeter pieces together because once you tie the shed in, that will tie all the foundation pieces together.Attach shed
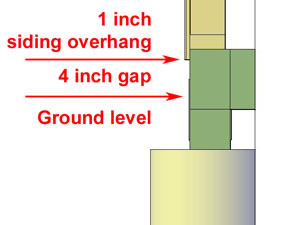 Attach the shed walls to this perimeter frame with 3 inch nails or screws through the bottom plate and galvanized 8d nails every 8 inches through the siding overhang.
This graphic shows a 5 1/2 inch tall frame with 1 inch siding overhang and 4 inch gap from ground level.
Attach the shed walls to this perimeter frame with 3 inch nails or screws through the bottom plate and galvanized 8d nails every 8 inches through the siding overhang.
This graphic shows a 5 1/2 inch tall frame with 1 inch siding overhang and 4 inch gap from ground level.Got animals?
As an option you can install more pressure treated wood below ground level to keep animals from digging under the walls.Concrete stem wall
Another option is to build a concrete stem wall.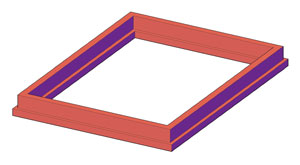 This can be a footer with a concrete block stem wall or a mono pour with the footer and stem wall made at the same time.
Build the outside of the stem wall the same size as your shed.
This can be a footer with a concrete block stem wall or a mono pour with the footer and stem wall made at the same time.
Build the outside of the stem wall the same size as your shed. Attach with j-bolts
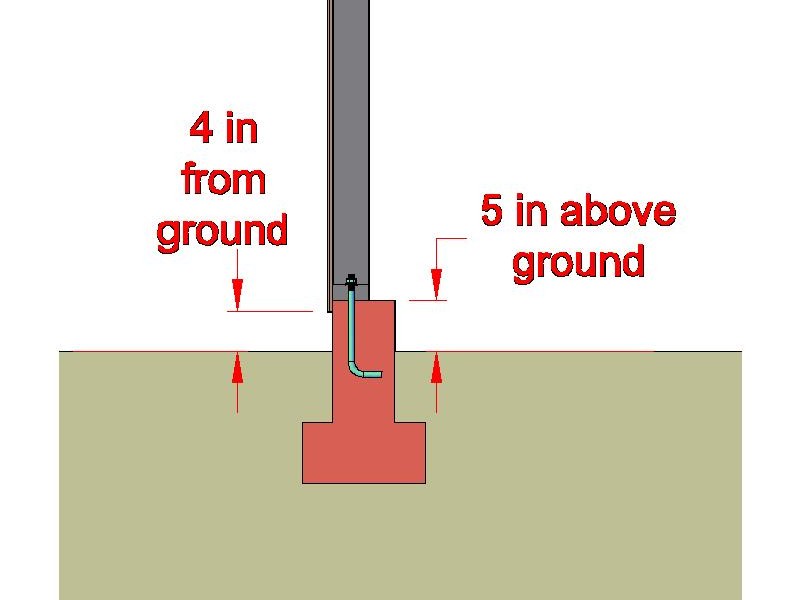 Attach the shed walls to the stem wall with j-bolts embedded in the concrete 12 inches off each corner then 48 inches on center.
The top of the stem wall should be 5 inches above ground level minimum, which makes a 4 inch gap from the ground to the bottom of the siding when using a 1 inch siding overhang.
Attach the shed walls to the stem wall with j-bolts embedded in the concrete 12 inches off each corner then 48 inches on center.
The top of the stem wall should be 5 inches above ground level minimum, which makes a 4 inch gap from the ground to the bottom of the siding when using a 1 inch siding overhang.Step 2: Floor
If you live in an exceptionally wet area or have a major termite problem you might want to use pressure treated wood for the entire floor including the skids, the floor joists and the plywood sheeting. This will add to the initial cost of your shed but it might also save you money in the long run because a floor built with pressure treated lumber will last longer in these areas. Prepare your materials... See Table 1 and Table 2: Get the number of floor joists you will need from Table 3, and the cut length for the band boards and floor joists and skid spacing from Table 2. See Figure 2: Cut your band boards and floor joists and lay out the band boards for 16 inches on center and drill two pilot holes for each 2x4joist, or three holes for each 2x6 joist. If you are building an 8 wide and using 2"x4"x92 5/8" precuts then you can use them here without any cutting. They will be 3/8" short but this will be split in half to 3/16" on either side when you cover the floor with plywood. You will save a few dollars over 2"x4"x8'ers and no one will be the wiser. 10 and 12 wide sheds use 2"x6" joists so you will have to cut them to length.
Assemble the frame: Lay the joists out on top of the pressure treated skids, spacing them about 16 inches apart.
Attach the band boards to the joists with two 3 inch screws or 16d nails at each joist.

Attach the skids: Position each skid as per measurement "D" from Table 2. Then drill pilot holes and toe nail both sides of the floor joists to the skids with 3 inch screws or 16d nails.
Except the front and rear joist.
Leave these two free so you can manipulate them to match the outside edge of the plywood sheeting as you nail it.

Square: Check the square by comparing diagonal measurements across the floor. Slid a skid back or forth until the measurements are equal.
Now the floor is square.

Level: Level the floor in all directions with a builders level. Add or remove a little dirt or gravel under the skids until the floor is level.
If necessary place a concrete block under each skid every 48 inches or less. Add blocks or wedges between the blocks and skids until the floor is level in all directions.
Recheck the square by comparing the diagonal measurements again.
Any extra effort you spent now to carefully level the floor will pay off when you start sheeting the roof. If the floor is not level, the roof sheeting will not fit properly and you might have to re-level at that time.

Tie downs: If you want to attach tie downs to the floor of your shed, now is the time. Attach them to the floor joists rather than the skids for an extra measure of security.

Nail the sheeting: Lay your best sheet of plywood along the front of the floor frame.
Square it up to the front corners and rim joist and nail along the front edge. Check the side edges for square along the frame and nail every 8 inches with 8d nails.
Repeat with the second and third sheet, putting the worst sheet at the back of the floor.

Extra blocking on 10 & 12 wide floors: If you're using regular CDX plywood as opposed to tongue and groove you should provide some extra support where the full pieces of plywood meet the cut pieces.
To make these blocks cut 12 inches off the ends of some of the 2x4's that you will be using for studs. You will need one less than the number of floor joists you have. These blocks will fit loosely, but that's ok.
Attach them to the underside of the plywood joint with three or four 2 inch screws. Leave about half of the block exposed.
After you nail the smaller pieces of plywood in place then put screws on the other side of the joint to match.
 Snap a chalk line across the floor every 16 inches using the screw heads on the band boards as a guide.
Nail the center of your sheeting along the chalk lines every 8 inches.
 Toe nail the front and rear rim joists to the skids. You have finished the floor.
Frequently asked questions
How strong is this floor?
My standard floors are strong enough for almost any application. I have a 24x20 shed (garage) floor built with 2x6's at 16 inch O.C. and 4x4 skids at 48 inch O.C that I have been parking 2 full sized pickups on for the last 5 years, and the floor is still sturdy.How can I make the floor stronger?
- You can make the floor stronger by putting the skids, blocks and joist closer together. 12 inch O.C. for the joists is about as strong as you can get. Put a few more skids underneath and more blocks under the skids making them closer together will add a lot of strength.
- Then you could use larger joists, like 2x8 or 2x10.
- And finally you can add another layer of plywood or 2 on top of the existing one.
Step 3: Trusses
- Read this post first if you want to use a ridge board in your shed
- Read this post if you want to change the roof pitch to 4/12 or 5/12
 Make a jig: Place two pencil marks eight feet apart on the edge of the unused 2x4 top plate.
Now cut two small pieces of wood and screw them to the outside of these marks. Then screw this jig assembly to the floor.
Prepare your materials: Measure and cut the pieces for the trusses. Use a speed square to mark the angles.
Drill a pilot hole in one of the pointy ends of every other truss piece so you can toe nail them together at the top joint. Also drill four pilot holes in both ends of the collar beams.
Make a jig: Place two pencil marks eight feet apart on the edge of the unused 2x4 top plate.
Now cut two small pieces of wood and screw them to the outside of these marks. Then screw this jig assembly to the floor.
Prepare your materials: Measure and cut the pieces for the trusses. Use a speed square to mark the angles.
Drill a pilot hole in one of the pointy ends of every other truss piece so you can toe nail them together at the top joint. Also drill four pilot holes in both ends of the collar beams.
 Assemble trusses: Put the ends of two truss pieces into the jig and press everything together.
Toe nail the top joint with a single screw through the pilot hole.
Position a collar beam parallel to the jig and screw it to the truss with four screws on each side.
Make a pencil mark on the floor along the top of the truss so you can compare the rest of your trusses to this mark as you build them. If a truss is off significantly you will know it immediately.
After you have built all the trusses you can double check them by standing them up on end and measuring the distance from the floor to the peak of the truss. If they are all equal (or close enough), then you are finished and can disassemble the jig.
If some of your trusses are slightly off, don't despair. If you use them properly this will not be a problem. Simply use the shortest pair of trusses to build the gabled ends with. Use the single tallest truss in the center of the shed. Use the next tallest pair, one truss on either side of the center truss. Use the last pair next to the gable ends. This way the roof will still be symmetrical and you won't not have to waste or rebuild the less than perfect trusses.
Assemble trusses: Put the ends of two truss pieces into the jig and press everything together.
Toe nail the top joint with a single screw through the pilot hole.
Position a collar beam parallel to the jig and screw it to the truss with four screws on each side.
Make a pencil mark on the floor along the top of the truss so you can compare the rest of your trusses to this mark as you build them. If a truss is off significantly you will know it immediately.
After you have built all the trusses you can double check them by standing them up on end and measuring the distance from the floor to the peak of the truss. If they are all equal (or close enough), then you are finished and can disassemble the jig.
If some of your trusses are slightly off, don't despair. If you use them properly this will not be a problem. Simply use the shortest pair of trusses to build the gabled ends with. Use the single tallest truss in the center of the shed. Use the next tallest pair, one truss on either side of the center truss. Use the last pair next to the gable ends. This way the roof will still be symmetrical and you won't not have to waste or rebuild the less than perfect trusses.
Step 4: Walls
You will build all the walls directly on the empty floor.- Read this post first if you want to build your shed with 8ft wall height.
- If you're going to build your shed on a concrete slab read this post to learn about anchor bolt placement and to find out how to make your shed 3 inches taller.
4a: Gable end walls
See Figure 4a and Table 2:Measure and cut the wall studs and plates for the gable end walls. Layout the top and bottom plates at 24” O.C. and drill two 1/8 inch pilot holes for each stud.

Frame The Gable End Walls:
Lay the wall studs on the floor spaced 24 inches apart and attach each stud to the top and bottom plates with two 3 inch screws or 16d nails.
Place Spacer Under Truss: Lay a truss on the floor touching the top plate with the collar beam facing down and slide a 1/2 inch spacer underneath the collar beam.
This will bring the truss up level with the top edge of the top plate.

Attach Truss: Drill 1/8 inch pilot holes through the outer ends of the top plate and secure the tips of a truss to the top plate with 3 inch screws.
The truss and top plate should be flush at the top edge of the top plate.
This screw is not for strength, it's just to keep the truss in position until it's nailed to the siding.
Check for square by comparing the diagonal measurements.

Sheet The Walls: Make sure the siding is square to the frame with 4 inches overhanging below the bottom plate.
Nail with 8d galvanized nails every 8 inches.
Snap a chalk line along the center of the top and bottom plates to identify those nail lines, and snap another line across the top of the truss and trim the excess siding.
Also trim the ¾ inch lip overhanging one edge.
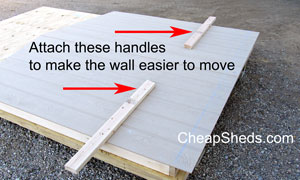
Attach Handles: Attach scrap pieces of 2x4's to the wall about knee high with 3 inch screws to make the walls easier to move.
This way you can stand the wall up vertically and have more control when you are ready to attach it to the floor and to the other walls.
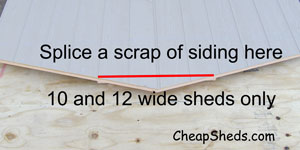
For 10 & 12 wides only: If you're building 10 or 12 wide gable end walls you'll need to splice a three to six inch scrap of siding to the top of the truss.
This is because the 10 and 12 wide sheds are also a little bit taller.
Line the grooves on the scrap up with the grooves on the end wall and nail it in place.
Build The Second Gable End Wall:
If you're going to put a door in this wall then proceed to Step 5 for instructions on how to frame a door into this wall.
Set this wall aside to make room to build the sidewalls.
4b: Side (or eave) walls
See Table 2 and Figures 4b, 4c, and 4d: The side walls have different measurements than the gable end walls. Measure and cut the wall studs and plates per Table 2 and Figures 4b, 4c, and 4d. The studs on these sidewalls are cut with an angle on the top end and the length measurement is at the short side of the angle.Important:
Make sure you build the sidewalls with the short side of the stud on the outside of the wall where the siding will be nailed. You do this by laying the studs down on the floor with the short side up in all cases.Installing a door in a sidewall
If you are going to put a door in one of the side walls then proceed to Step 5 for instructions on how to frame a door into this wall. Build the blank wall first then build the door wall on top of it. See Figure 6: Layout and drill pilot holes: Layout the top and bottom plates at 24” O.C. and drill two 1/8 inch pilot holes for each stud. These plates are 7 inches shorter than the overall wall length because they will sit inside the gable end walls. So when you lay these side walls out, the end studs will be 3 1/2 inches closer to the next stud than with the gable end walls as per Figure 6.
Attach the bottom plate: Lay the wall studs on the floor (with the short side up) spaced about 24 inches apart.
Attach each stud to the bottom plate with two 3” screws or 16d nails.
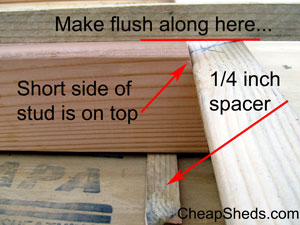
See Figure 4c, Spacer detail: Before you attach each stud to the top plate put a 1/4 inch spacer below the end of the stud to raise it up so that the the stud will be in proper alignment with the corner of the top plate so that the siding will lay flat.
Lay a scrap of wood along the stud extending past the top plate to double check that this spacing is correct.
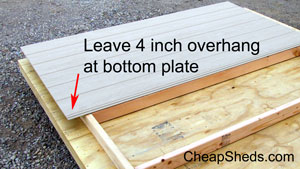
Sheet walls: Make sure the siding is square to the frame with a 4 inch overhang at the bottom plate.
Snap a chalk line along the center of the top and bottom plates and along the outermost two studs to identify those nail lines.
Nail with 8d galvanized nails every 8 inches.

Snap a chalk line, then trim the ¾ inch lip overhanging the ends. There will be no overhang on 10 wide ends.
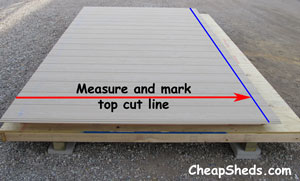
Top Cut Line: Measure and mark from the bottom of the siding and snap a chalk line to mark the top cut line.
Cut this excess siding off which will leave a 3 1/2 inch overhang at the top plate.
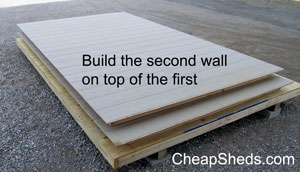
Build the second sidewall: Leave this finished wall in place and build the next wall directly on top of it.
Paint Now?
Now that all the walls are complete you might want to paint the walls and trim while you can work on them laying horizontally. They will be much easier to paint this way.Step 5: Build The Door
This door construction method saves time and materials because you are using the materials cut out from the rough opening that would otherwise be thrown away. You will make an outer frame which is built in the wall and the inner frame which is the actual door. You will frame and sheet these two simultaneously. Later in step 7 you will cut the door out. This is the most complicated part of building your shed. It's not difficult, it's just lots of details. But if you follow the steps closely you will have few if any problems.There are 2 places where you can get in trouble here
- Not properly locating your cut lines before you nail your siding in place.
- Nailing the door to the bottom plate so that it will not open.
Door on gable end
 For a door in the gable end wall use a regular king stud.
Door on sidewall
 For a door in a sidewall use a king stud with an angle on it.
Just remember to build with the short side of the angle up toward the siding. Otherwise there is no difference in the door construction.
For a door in a sidewall use a king stud with an angle on it.
Just remember to build with the short side of the angle up toward the siding. Otherwise there is no difference in the door construction.Double doors
 If you need doors wider than 60 inches then you should make double doors. Wide doors will be more of a maintenance problem because they are heavier and will sag more and sag sooner.
But if you make double doors you will have the additional width without the potential door sagging problem.
I will handle double doors in a separate post.
If you need doors wider than 60 inches then you should make double doors. Wide doors will be more of a maintenance problem because they are heavier and will sag more and sag sooner.
But if you make double doors you will have the additional width without the potential door sagging problem.
I will handle double doors in a separate post.Motorcycle shed
If you plan on using your shed for motorcycle parking then you might want to make the door about 60 inches wide. You might even think about adding a second door to make the shed drive through.Wider or narrower doors
These instructions will make a door with a rough opening width of 43 inches. This is usually big enough for most large items like wheelbarrows or lawnmowers. To make the door wider or narrower just adjust the length of the door header to give your desired rough opening size then add or subtract the same amount to the horizontal cross pieces and horizontal trim pieces.Door location
You can place the door anywhere on any of the walls you like. However I recommend that you place it on some increment of 12 inches. Then the location of the vertical uprights are covered by Figure 5b. Otherwise just add an additional vertical upright to the inner door frame where the siding breaks.Make the outer door frame
 Cut jack and king studs, spacers strips and header. Build a sandwiched door header by nailing a piece of scrap siding between two 2x4s.
This extra half inch makes the total width to 3 ½ inches, the same as the height of a 2x4.
Cut jack and king studs, spacers strips and header. Build a sandwiched door header by nailing a piece of scrap siding between two 2x4s.
This extra half inch makes the total width to 3 ½ inches, the same as the height of a 2x4. Nail the jack studs to the king studs then nail them to the sandwiched header.
 Nail the outer door frame and the two outside studs to the top and bottom plates.
Make the inner door frame
 Cut six) 3x3 inch spacers from the triangular scraps of siding you trimmed from the gable ends.
Put the spacers loosely inside the outer frame, 2 into both top corners and one along the side of each bottom corner. These are to keep the inside door frame from shifting until you get it nailed to the siding.
Measure and cut two cross pieces and three uprights. Lay all the pieces in the frame to check the fit.
Cut six) 3x3 inch spacers from the triangular scraps of siding you trimmed from the gable ends.
Put the spacers loosely inside the outer frame, 2 into both top corners and one along the side of each bottom corner. These are to keep the inside door frame from shifting until you get it nailed to the siding.
Measure and cut two cross pieces and three uprights. Lay all the pieces in the frame to check the fit. Remove the five pieces, lay them on the floor and assemble with screws.
Measure and attach the two center cross pieces half way top to bottom..
Verify that this assembly lays flat and is not warped in any direction.
Remove the five pieces, lay them on the floor and assemble with screws.
Measure and attach the two center cross pieces half way top to bottom..
Verify that this assembly lays flat and is not warped in any direction. Lay this door frame inside the wall frame with the spacers at the top and sides. It should fit nicely and not move around.
Install the truss and remember the ½ inch spacer below the collar beam.
Check for square by comparing diagonal measurements.
Lay this door frame inside the wall frame with the spacers at the top and sides. It should fit nicely and not move around.
Install the truss and remember the ½ inch spacer below the collar beam.
Check for square by comparing diagonal measurements.
Important...
Measure and record the distance from the center of the middle stud to the inside edge of the rough opening in both directions. These measurements will locate your vertical cut lines after the siding is nailed on. Lay the first piece of siding in place. Square it up to the center stud and check for proper overhang on the bottom.
Put a single nail in the door frame's bottom cross piece. But don't nail into the bottom plate because doing so will nail the door shut.
Put a single nail in the center door cross piece and top door cross piece, and in the top plate.
Put a nail at the outside ends of the top and bottom plates.
Lay the first piece of siding in place. Square it up to the center stud and check for proper overhang on the bottom.
Put a single nail in the door frame's bottom cross piece. But don't nail into the bottom plate because doing so will nail the door shut.
Put a single nail in the center door cross piece and top door cross piece, and in the top plate.
Put a nail at the outside ends of the top and bottom plates.Important
 Make a mark 1/2 inch above the bottom of the door header. This mark must be visible when the second piece of siding is installed. Lay the next piece of siding in place and put 4 nails in to match the nails in the other piece of siding.
Then put one nail into the end of the top and bottom plates. Snap a chalk line along the top and bottom plates and along the top of the truss where you will trim it.
Nail across the top plate only, do not nail the bottom plate at this time. And nail the outside studs and along the truss inside the chalk line.
Make a mark 1/2 inch above the bottom of the door header. This mark must be visible when the second piece of siding is installed. Lay the next piece of siding in place and put 4 nails in to match the nails in the other piece of siding.
Then put one nail into the end of the top and bottom plates. Snap a chalk line along the top and bottom plates and along the top of the truss where you will trim it.
Nail across the top plate only, do not nail the bottom plate at this time. And nail the outside studs and along the truss inside the chalk line.Locate your cut lines
 Place a pencil mark at the top and bottom of the siding half the rough opening width plus ½ inch in either direction (from the measure you took above just before you installed the first piece of siding).
Snap a chalk line on both these marks. These are your two vertical cut lines.
Measure from the top of the siding to the mark you made ½ inches above the bottom of the door header and transfer this measurement to both ends of the wall and snap a chalk line. This is your horizontal cut line for the top of the door.
Measure from the top of the siding to the middle of the door center cross piece as evidenced by the nail heads. Transfer these measurements to both sides of the wall and snap a chalk line.
Now you should have:
Place a pencil mark at the top and bottom of the siding half the rough opening width plus ½ inch in either direction (from the measure you took above just before you installed the first piece of siding).
Snap a chalk line on both these marks. These are your two vertical cut lines.
Measure from the top of the siding to the mark you made ½ inches above the bottom of the door header and transfer this measurement to both ends of the wall and snap a chalk line. This is your horizontal cut line for the top of the door.
Measure from the top of the siding to the middle of the door center cross piece as evidenced by the nail heads. Transfer these measurements to both sides of the wall and snap a chalk line.
Now you should have:
- Two vertical chalk lines
- Four horizontal chalk lines
- Plus the chalk lines for the truss
Inner door trim
 Measure and cut a piece of trim to fit between the two vertical cut lines at the top cut line. Place the top edge of this piece at the top cut line and nail it ¾ inch from its bottom edge and within two inches of each end.
Measure and cut two vertical pieces to run from the bottom of this piece to the bottom edge of the siding. Nail these ¾ inch from their inside edges from top to bottom to within two inches of the bottom plate chalk line.
Measure and cut a piece of trim to fit between the two vertical cut lines at the top cut line. Place the top edge of this piece at the top cut line and nail it ¾ inch from its bottom edge and within two inches of each end.
Measure and cut two vertical pieces to run from the bottom of this piece to the bottom edge of the siding. Nail these ¾ inch from their inside edges from top to bottom to within two inches of the bottom plate chalk line. Measure and cut the last two horizontal trim pieces.
Position the middle piece of trim so that it's centered on the chalk line and nail it down the middle.
Position the bottom piece of trim so the lower edge lies on the bottom plate chalk line and nail ¾ inches from its top edge.
Measure and cut the last two horizontal trim pieces.
Position the middle piece of trim so that it's centered on the chalk line and nail it down the middle.
Position the bottom piece of trim so the lower edge lies on the bottom plate chalk line and nail ¾ inches from its top edge.Outer door trim
 Cut five spacers from scrap trim about 1 inch wide. Lay two of these spacers along the top trim piece and the other three on the outside of the first vertical piece of trim.
Lay a piece of trim horizontal along the top two spacers and another piece vertical along the other three spacers and pull them tight into the spacers.
Measure and cut the vertical piece of trim so that it extends between the bottom of the siding to 7/16 inch above the top edge of the top horizontal trim, as allowed by the spacer. Nail this in place.
Move the three spacers to the other vertical trim piece and measure, cut and install the same way. Then measure, cut and install a horizontal piece across the top of the two vertical pieces you just installed.
The door trim is now complete.
Cut five spacers from scrap trim about 1 inch wide. Lay two of these spacers along the top trim piece and the other three on the outside of the first vertical piece of trim.
Lay a piece of trim horizontal along the top two spacers and another piece vertical along the other three spacers and pull them tight into the spacers.
Measure and cut the vertical piece of trim so that it extends between the bottom of the siding to 7/16 inch above the top edge of the top horizontal trim, as allowed by the spacer. Nail this in place.
Move the three spacers to the other vertical trim piece and measure, cut and install the same way. Then measure, cut and install a horizontal piece across the top of the two vertical pieces you just installed.
The door trim is now complete.Step 6: Raising And Attaching The Walls
Now its time to attach the four walls to the floor. If you skipped ahead to step 11 to paint the walls then you have already moved them off the floor and onto the ground.
If your side walls are still laying on the floor, then move them about a foot from the back edge so you'll have sufficient room to work.
 See Figure 6:
 Set the back gable end wall vertical on the edge of the floor and center it from side to side.
When it's in the correct position attach it to the floor by nailing through the siding and into the floor frame about two inches above the bottom edge of the siding with 8d galvanized nails every 8 inches.
Cheating when necessary...
If a wall doesn't line up with the floor then put a car jack under the floor and raise it up to fit the wall. Nail that part of the wall in place then move the jack. Do this at any place where the floor doesn't meet the wall. Remember this cheat when you apply the roof sheeting. Put a jack under a corner and raise it up till the roof sheeting comes in line with the truss. Then nail that piece down. Do the same with the rest of the pieces. Experiment with jacking different corners or walls until you get the results you want. After the roof is sheeted then go around and re level the floor. If your shed is slightly out of square at the end of all of this, don't worry as it will not be enough to notice. This is the real world way to make all the pieces fit together. In my shed building business I have special pulling straps and jacks for this purpose because sheds never come together perfectly without a little "assistance". But any old car jack will do.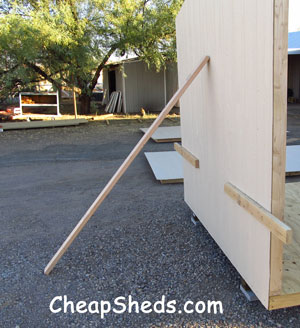 Add a brace if necessary:
 Put a 16d nail in the center of the back of the wall and add a temporary 2x4 brace to the ground if necessary.
 First sidewall:
Stand the first sidewall and slid it firmly into the bottom plate of the end wall.
Make sure the corner studs are tight together from top to bottom and nail through the sidewall siding into the end wall corner stud from top to the bottom.
Then nail across the floor about 2 inches from the bottom edge of the siding.
 Second sidewall:
Raise the other sidewall and nail the corner joint and across the bottom of the siding into the floor frame.
 Last gable end wall:
Move the last gable end wall into place and nail up and down the corners then nail across the bottom.
Caution:
Which ever wall contains the door, don't nail across the bottom of the door because that will be nailing it shut.
Remove the carrying handles. Now it's starting to look like a shed...Step 7: Finish The Door
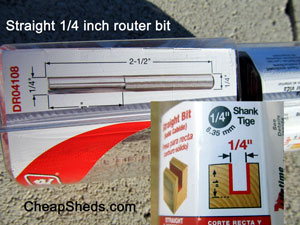
Router bit: You'll need a straight 1/4 inch router bit available from any hardware store.
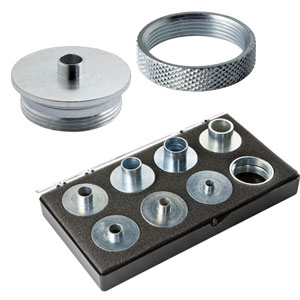
Router collar: You'll also need a router collar with an inside diameter slightly larger than 1/4 inch.
It will consist of the collar and a threaded ring to hold it to the router base.
You can typically purchase them individually or in a set.
Adjust the cut depth: Adjust the cut depth of the bit to the thickness of the siding plus the thickness of the trim, plus about 1/8 inch extra.
If you are using typical 7/16 inch siding that will add up to 1 inch.

See Figure 7, First router cut: The gap between the inner and outer door trim will guide the router collar as the bit cuts through the siding.
Start at the bottom of the side where you are installing the hinges and pull the router through the gap between the trim up to the top and about half way across the top of the door.
Make sure you cut well past where the hinge will be mounted so that it will not interfere with the router base when you start the second cut.
If you are not cutting through the siding then set the cut depth a little deeper until you just graze the 2x4 frame below the siding.
If your depth is set a little too deep it will not hurt anything. You will just have to work harder because you are cutting through more wood.

Mount the hinges: Locate where you want the hinges and drill ¼ inch holes for carriage bolts.
Use a long drill bit because you will have to go through 1 inch of trim and 3 ½ inches of wood.
Mount the hinges by driving 5 inch carriage bolts into the holes.
Place a second ladder inside the shed and climb inside. Install the washers and nuts and remove the door spacers.

Second cut: Finish cutting across the top of the door where you left off and cut and down the latch side to the bottom edge.

Open the door: Open the door and inspect your work.
If you located your cut lines correctly you will have an even half inch reveal all around the door.

Mount the latch: Locate where you want the latch to go and drill ¼ inch holes. Mount with carriage bolts.

Remove bottom plate: And finally, use a hand saw to cut the bottom plate out of the door opening between the door frames.
Step 8: Install Trusses and Frame The Roof
- Read this post first if you want to include the optional 3 1/2 or 5 1/2 inch overhang on all 4 sides
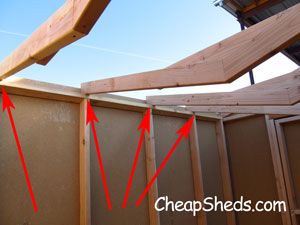
Hang trusses: Hang the trusses upside down between the walls with each end resting on the top plate directly over a wall stud.
For aesthetic purposes only: Make sure to hang the trusses so that the collar beam on all trusses face the same direction... Either facing to the front of the shed or to the rear.
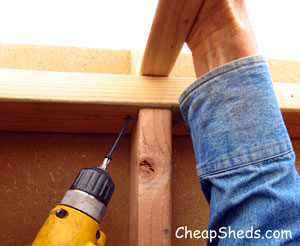
Install trusses: Stand the first truss upright and center it over a stud.
The wall studs and trusses are both 24 inch on center so just align the end of a truss up with the stud under the top plate and it will be in the correct position.
Make sure the truss is pushed tight against the siding and run a 3 inch screw through the bottom plate into the truss on both sides of the stud.
Do the same for this the rest of the trusses on this side.
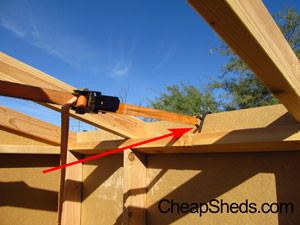
The other end: If the other end of the truss doesn't fit tight against the siding you can hook the ends of a cargo strap over the siding on either wall and gently pull the walls together until they fit tight to the ends of the truss.
Then run a 3 inch screw through the bottom plate into the truss on both sides of the stud like before.
Repeat for all trusses.
Optional overhang
If you want to add 3 1/2 or 5 1/2 inches of overhang then read this step now. Continue below for no overhang.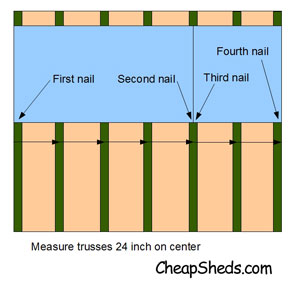
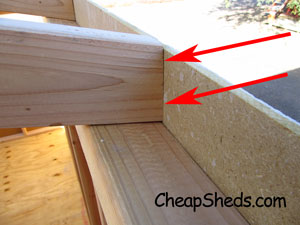
Install the roof sheeting: Begin installing the roof sheeting with a full 8 ft sheet aligned at the top edge of the truss and put a single nail in the outside corner at the top of the truss.
Start the edge of the sheeting at the outside edge of the end truss.
Split the truss with the opposite edge of the sheeting and nail into the truss at the top corner.
Repeat for the rest of the large pieces of sheeting on the first side.
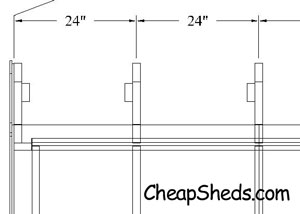
See Figure 8: Measure and mark the truss spacing for the rest of the trusses and nail with a single nail at the top of the truss at 24 inches on center.
Measure the end truss spacing from the outside edge of the end trusses to the center of the closest truss, not including the siding (from the joint of the siding and the truss).
The inside trusses are measured center to center.
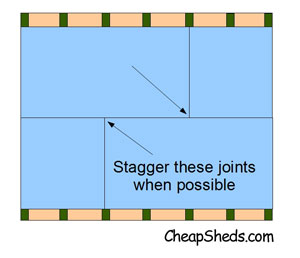
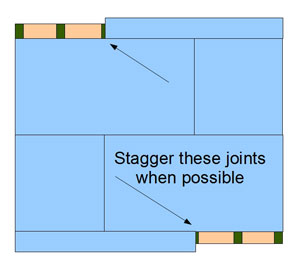
Stagger the seams: Nail the large sheets for the other side along the top of the trusses only, but stagger the seams if possible for a stronger shed.
Nail bottom edge: Check that the bottom edges of the sheeting are properly aligned with the trusses. The edge should align with the edge of the outside trusses or in the center of the inside trusses.
If they don't align properly that means either that the floor isn't level or the walls are not square.
But don't be alarmed if they aren't properly aligned because that rarely happens.
The cure is to put a jack under one corner of the shed and lift it until the sheeting comes into proper alignment. If jacking makes it worse then you are lifting the wrong corner of the shed. Move your jack to the adjacent corner and try again. When a piece of sheeting lines up properly then nail it into the truss below.
Continue jacking different corners of the shed until you get all the pieces of roof sheeting in proper alignment and nailed in place.
You might have to re-level or re-block your shed at this point.
Snap a chalk line to identify the underlying trusses and nail the sheeting in place with 8d nails every 8 inches. Put plenty of nails at both edges of the sheeting, particularly where the sheets meets at a truss.
Secure siding to trusses: Nail two 8d nails from the outside through the sidewall siding into both ends of each truss to further secure the roof structure to the rest of the shed.
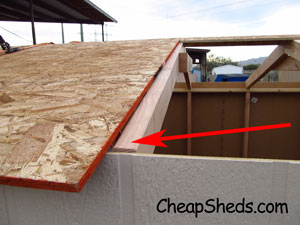
Finish sheeting: Stagger and install the bottom row of roof sheeting. You should have a 2 inch overhang on the eave sides and nothing at the gable ends.
Step 9: Install The Trim
See Figure 9 for cut dimensions

Cut (6) pieces of trim item A and (6) pieces of trim item B. The only difference between the two is the direction of the angle.
Then cut (4) pieces of trim item C.
All the dimensions for the trim are longer than the final size because they will need to be individually cut to fit.
Gable end trim

Nail 1 piece of trim A and B to each of the gable ends starting at the top center.
They will overhang quite a bit but you will trim them to fit later. Nail with galvanized nails every 6 inches.
 Make sure the top edge of the trim lines up with the top surface of the OSB and not with the top edge of the siding. This 1/2 inch gap will be covered by the drip edge and shingles.
Corner trim

Take a piece of trim C and hold it firm to the bottom of the OSB and to the front gable trim piece. Mark the bottom and cut to length. Then nail the top 6 inches in place.
Take a piece of the front angle trim A or B and hold it in place flush to the edge of trim C and tight up to the gable end trim. Mark the bottom and cut to length. Hold in place and nail the top 6 inches.
Now line the corner edges of the two trim pieces up and nail from the top to the bottom being careful with the edge alignment.
Repeat for all corners.
Eave trim
 Nail a full length piece of trim up under the eave tight to the bottom of the OSB. Cut the final eave piece to fit and nail in place. Repeat for the other side.
Trim gable end pieces
 Mark and cut the excess off the gable end trim pieces. This trim piece will be shorter than the OSB roof sheeting but that gap will also be covered by the metal flashing and shingles.
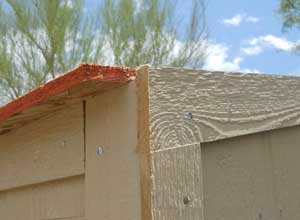 This is what the final trim will actually look like.
Step 10: Shingle The Roof
Installing shingles on the roof of your shed might seem complicated but it's easy if you take it one step at a time. Use 3/4 inch long galvanized roofing nails for all the roof work.Eave drip edge
 First install the drip edge on the eave edges. I am using 3 inch “D” style with a primer. I already painted it to match my trim.
Felt paper
 Install a layer of 30# felt paper. Use just enough nails to keep it in place.
Gable end drip edge
 Install the gable end drip edge on top of the felt paper.
Starter row
 Install a starter row of shingles. These are shingles with the tabs cut off that you mount and nail close to the edge.
The glue strip on this starter row will hold the tabs of the next row of shingles in place.
Install a starter row of shingles. These are shingles with the tabs cut off that you mount and nail close to the edge.
The glue strip on this starter row will hold the tabs of the next row of shingles in place.Alternate rows with half tab removed
 You want to stagger the joists between the shingles to prevent leaking and water damage.
Begin the starter row with a full shingle, then cut half a tab off every other row of shingles.
This way every joints where the shingles come together will be covered by a full tab above it.
You want to stagger the joists between the shingles to prevent leaking and water damage.
Begin the starter row with a full shingle, then cut half a tab off every other row of shingles.
This way every joints where the shingles come together will be covered by a full tab above it.Shingle spacing
 Most shingle manufacturers specify 5 inches of exposure.
Put 4 roofing nails in each shingle about 5/8 inch above the tab cutout but below of the glue line.
Most shingle manufacturers specify 5 inches of exposure.
Put 4 roofing nails in each shingle about 5/8 inch above the tab cutout but below of the glue line.Stack some supplies
 Stack some shingles along the ridge line and install the shingles from the bottom eave up to the top.
Start the shingles from the front of the shed and work to the back because the starting edge will be neater and less ragged than the edge you cut to fit.
Work from the same end on both rows. This way you can use the cut offs from one side to finish the row on the other side.
Stack some shingles along the ridge line and install the shingles from the bottom eave up to the top.
Start the shingles from the front of the shed and work to the back because the starting edge will be neater and less ragged than the edge you cut to fit.
Work from the same end on both rows. This way you can use the cut offs from one side to finish the row on the other side.Cutting surface
 Use a utility knife, a straight edge and a cutting board to trim the last shingle in each row to fit.
Use the cutoffs from the other side of the shed if they are long enough.
Use a utility knife, a straight edge and a cutting board to trim the last shingle in each row to fit.
Use the cutoffs from the other side of the shed if they are long enough.Keeping your rows straight
 Measure each end of the row every few rows to make sure they aren't getting narrower or wider. If so, make it up on the next few rows.
Don't wait till you get all the way to the top to find that your rows are uneven. If you can't do it by eye then snap a chalk line.
You can also use the lines on the felt paper if you installed it square. But most likely you will need to snap a chalk line.
Measure each end of the row every few rows to make sure they aren't getting narrower or wider. If so, make it up on the next few rows.
Don't wait till you get all the way to the top to find that your rows are uneven. If you can't do it by eye then snap a chalk line.
You can also use the lines on the felt paper if you installed it square. But most likely you will need to snap a chalk line.Cut ridge cap
 Use your utility knife and straight edge to cut a stack of shingle tabs to nail along the ridge cap.
The back edge of each tab tapers in so that it will fit neatly under the tab on top of it.
Use your utility knife and straight edge to cut a stack of shingle tabs to nail along the ridge cap.
The back edge of each tab tapers in so that it will fit neatly under the tab on top of it.Nail ridge caps
 Nail the row of ridge cap tabs on and you are finished with the roof.